Sunday, May 31, 2015

No-Knead (slow rise) Olive Bread

Making your own bread might seem like a waste of time to some, especially with so many amazing bakeries here in the Bay Area, but it's a very satisfying task, saves you money (those six-dollar loaves and four dollar slices of toast can really add up), and it's actually easier than you might think. You don't have to turn up the heat in your apartment to 85 to create natural yeast or anything extreme like that, but if you haven't read about when Jeffrey Steingarten did that in The Man Who Ate Everything, I highly recommend you pick up a copy. Hi.La.Ri.Ous.


Some years ago my old hometown friend Adam shared a link to the now incredibly famous No-Knead Bread recipe shared by Jim Lahey to Mark Bittman's NYT blog.  I tried it and it made such lovely bread that I'll probably never need another base recipe (unless I'm making sandwich bread or focaccia). You don't need a mixer or super strong forearms for kneading. The only "specialty" equipment you'll need for optimal results is a 5-6 qt Dutch oven or stock pot with a lid that's oven-proof to 450 or 475 degrees. Why the lid? It traps the steam let off by the bread and makes an amazing crust with a good chewy bread inside. A recipe I tried once suggested using a spray bottle periodically for the same effect, but I'm sticking with the pot.

The original recipe takes very little work but a total of 15-22 hours including rising times, so it is weekend bread for those of us with full-time gigs. That timing is what I'm working off of here, but I also add adjustments for weekdays (more yeast allows for a faster rise time).

So why olives? Olives are one of my absolute favorite things on earth and one of the few things I like in my bread. Much as I love raisins and walnuts, I don't really like them in bread. It's a texture thing, I guess. You can certainly leave the olives out and replace them with one of those other things.


First, drain and chop 1 to 1.5 cups pitted brined olives. I'm using green, which are milder and thus can be used with a wider variety of sandwich fillings, but they usually need to be pitted if they're not stuffed with something. I got a jar at Trader Joe's instead of hitting the expensive olive bars at the specialty markets. You could use Kalamatas if you preferred, but not the old-school black olives in the can. Those are too mild to stand out in the bread.

If you need to pit the olives, smash them with the side of a chef's knife. Yes, you could use an olive pitter, but for me the little suckers always go flying when I try that. Pull out the pits and set the "meat" aside. 


Chop the olives into 4-6 pieces each. If you use walnuts instead, give those a rough chop as well.

Add the olives to a large bowl with 3 1/4 c flour, a heaping 1/4 tsp instant or active dry yeast*, 1/2 tsp fine salt (up the salt to 1 1/4 tsp if you're not using olives), and 1 2/3 c warm water.  Make sure the yeast you're using has an expiration date very far from the day you're using it or you might not get good results.

I use 2 c all purpose and 1.25 c whole wheat, but you can use any combination of those you like. All white flour (bread or all-purpose) will give the best crust, hands down. 

*Faster rise options: use 1 tsp instant yeast for a 6-10 hour rise, 3/4 tsp rapid rise yeast for a 4-6 hour rise.


Now just mix it all together with a wooden spoon or a pair of clean hands. The dough should be kind of sticky and a little wet.


Cover the bowl with a clean dish towel or a piece of plastic wrap and let sit in a warm spot for 12-18 hours.* "Warm" means 70 degrees or so and my apartment is rarely that warm, especially since the June fog has decided to visit us a month early here in the Bay (#KarlTheFog). I turn on the hood light over the bowl to keep it just a smidge warmer than the rest of my kitchen.


*Faster rise options: remember if using more yeast, let sit for the time indicated above. You can mix it together before work and pick up the next step when you get home. 


After the rising time, the dough will have spread around the bowl and developed these little holes and bubbles at the surface. Usually I see more of the bubbles, but since it has doubled in size and that's the most important thing, I'm not worried. I could let it go another hour, but a girl's gotta keep her yoga schedule.

If some of the surface looks a little dried out, don't worry about that either. It'll re-hydrate in the next step.


Generously flour a wooden board and turn the dough over a few times, folding an end and pushing down with the heel of your hand. OK, technically this is kneading, but it's just for a few seconds as opposed to ten minutes. 

Now flour a large piece of parchment paper and put that under the dough. You could also use a second clean dish towel, but you'll need to use a LOT of flour for that to keep it from sticking.


Create a ball with the dough with the smooth side up and rough sides underneath. It's hard to see here because the olives disrupt it, but the dough is having a lovely alchemical moment and creating the basis for the lovely crust.

Cover again with the dish towel (or a clean one if you put if on something dirty by accident) and tuck it in for a nice nap.


After 60 minutes (30 min for the faster rise options), put the empty pot in the oven and turn the oven on to 475 degrees for a 30 minute pre-heat. 450 is perfectly fine if that's as hot as your pot will handle. Some recipes say to put the lid on for the pre-heat, but I find that it makes things too complicated when it's time to put the dough in the pot. I leave it off until the dough goes in to avoid burning myself. 

After the 30 minute pre-heat, CAREFULLY remove the pot from the oven with your biggest oven mitts or maybe double pot holders. Not only is the pot extremely hot, but also the weight of the pot will cause the heat to go to your skin more quickly if your finger slips. This is a lesson I learn over and over again, maybe so I'll remember to share it with you.


Pick up the parchment or towel and flip the dough into the pot. I didn't put enough flour, so it stuck to the paper a little. If that happens, just peel it off carefully, a little at a time. If you put too much flour, it sprinkles all over the place and stains your pot. Any tips for cleaning burnt on stuff from enamel would be appreciated!

Put the lid on the pot and return it to the oven.

Bake for 30 min, remove the lid, turn down the heat to 450 and continue baking for 15-20 minutes more until the crust is a lovely medium brown.


Carefully remove the loaf to a wire rack and let cool at least 30 minutes...if you can manage to wait that long. Bread smells awfully good when it's baking!

Slice with a bread knife and eat as is, with some good butter (the kind from grass-fed cows) or use to make hearty sandwiches.

Egg salad or sliced turkey would be particularly good with this bread.


right click recipe image to save, then print from your computer. 


Sunday, May 24, 2015

Crispy Waffles with Blueberry Bourbon Sauce and Banana

It's blueberry season! I was thinking cobbler, then I was thinking blueberry pancakes, but then I remembered I don't actually love blueberries IN my pancakes, but I love blueberries ON my pancakes. From there it was just a couple more synaptic leaps from the blueberry infused bourbon a kind bartender shared with me recently, the ripe bananas on my table and the waffle iron gathering dust in my cabinet to this inspired weekend treat!


Melt 12 Tbsp butter (1.5 sticks) and let cool for the waffles.

For the sauce: Rinse 1 dry pint blueberries (a little over 2 cups) and remove the stems. Add them to a 1 or 2 quart saucepan with 3/4 c bourbon, 2 Tbsp water and 2-4 Tbsp sugar depending on your taste and how sweet the berries are. If you don't want to use alcohol, just replace it with water and add some more sugar and a little lemon peel. 

Bring to a boil, boil for about two or three minutes to let most of the booze cook off, and then reduce the heat and let simmer, uncovered, for 10-15 minutes.


Set aside and let cool to room temperature. Try not to dive in with a big spoon. This sauce would also be amazing with vanilla ice cream and/or pound cake, or even on chicken.

OK, now back to the waffles...


Mix the dry ingredients in a medium bowl:
2 c all purpose flour (a mix of whole grain and all purpose would also be good)
2 Tbsp corn meal (optional)
3/4 tsp salt
3/4 tsp baking soda


Separate 2 eggs. Put the whites in a mixer bowl (or a bowl you can use a hand mixer in). Beat on medium with the whisk attachment or regular beaters until frothy, then sprinkle in 2 Tbsp sugar and turn it up to high. Beat until the whites stay up in a stiff peak when you pull up the beater.

Mix the yolks in a large bowl with 1 1/2 c milk (or 1 3/4 c buttermilk, but I'm out), the melted butter from above, and 2 tsp vanilla extract.

Plug in your waffle iron to start heating it up.

Add the dry ingredients to the wet ingredients and mix just until well combined.


Fold the egg whites into the batter - this will help keep the waffles nice and light. Isn't it a bummer when you order some in a restaurant and they turn out gummy?

Anyway, put the whites on top of the other mixture and fold them in gently with a rubber or silicone scraper, pulling up from the bottom and turning the bowl as you go.

Melt 2 more Tbsp butter to brush onto the waffle iron. When the iron is hot (the light on mine turns green, but follow the directions for yours), brush some butter onto the top and bottom. You could use oil for this if you prefer. 


Spoon some batter into each of the four inner corners of your waffle iron. It will spread out once you close the machine. I tend to under-fill rather than over-fill because it's an easier clean-up!

Close the iron and let cook until it tells you it's ready. Don't open it before that unless you smell burning!


If you over-fill, this will happen. It's no big deal, just put a little less the next time. I scrape the leaks off so they don't have a chance to burn onto the iron!


While you wait, you'll see this lovely steam escaping and smell the vanilla. Mmmmmmm.

Turn on the oven to 200 degrees to prepare for the final crisping step.

Keep the butter or oil at the ready to re-grease between waffles.


Remove from the iron with a fork - don't be a hero and try to take it out with your fingers! Or don't be lazy like me and decide getting a fork is a bother...stick the fork into or under the edge of the waffle and lift up from there.

This color is perfect to me and the first one came out like this! Miraculous! Usually the first is a throwaway like with pancakes, so if it is, just adjust the settings on your waffle iron and get to the next one.


As each waffle comes out, pop it directly onto the rack in a 200 or 250 degree oven. Yeah, I ate a corner of the first one to test it. It was kind of crispy, but the rest was much crispier after 10 minutes or so in the oven. A little extra crispiness will help a lot once the sauce goes on.


Slice about 1/2 a medium banana for each waffle, because what goes better with blueberries than bananas? If you don't like them, no biggie, just leave them off.

Spoon some sauce over each waffle and enjoy them right away! If the waffles will sit for a while, put the sauce on the side so they don't get soggy. Freeze leftovers and re-heat from frozen in the toaster, not in the microwave. 


Sunday, May 17, 2015

Empanadas Criollas - my favorite recipe for beef empanadas

If you ever ask a table full of Argentines how to make beef empanadas, you'll get as many different tips as there are people at the table. "Put sugar!" "No, no sugar!" "Chili pepper!" "No!" "You need the meat from THIS part of the cow! (pointing to the upper back)" and one of my personal favorites, "Add a cup of lard!" It has been my goal to listen and synthesize the advice (minus the lard suggestion), and over time I came up with this recipe. Click HERE for the pastry and assembly instructions. You may have leftover dough using these amounts, so you could increase everything by 1/3 OR use the rest of the dough for another kind of filling. These days you can find the pastry in a lot of Latin or Italian markets in the freezer. The package will say "Tapas para Empanadas".


The two main variations are usually "saladas" or "dulces", meaning "savory with olives" or "sweet with raisins". My favorites were always the "Criollas", which as the name implies are a mix of both styles. Some people are funny about raisins and olives, though, so I chop them up very finely so the flavors are all there without the textures taking over. 


Dice 2 medium onions (about 1 lb by weight). Saute in 1 or 2 Tbsp oil over medium low heat for about ten minutes until soft. It's OK if they caramelize a little, but you don't want much browning.

Before the onions finish cooking, stir in 2 1/2 tsp oregano, 1 1/2 tsp cumin, 1 tsp salt, 2 tsp sugar (I heard you, Tio Placido!), and 1 tsp black pepper. If you like, you can also add a couple of teaspoons of paprika or cayenne.

Meanwhile, pour a little hot water over 1/3 c raisins to plump them up. Drain and mince the raisins.

Mince 1/3 to 1/2 c pitted Spanish or French green olives, depending on how strong they are. Mine were pretty mild, so I needed more.

Chop 1/2 c parsley leaves finely.

Set these ingredients aside for the moment.

Finding pitted green olives without stuff in them can be hard, so I usually have to pit them myself. (You can use the ones with pimientos in a pinch, just no garlic- or blue cheese-stuffed ones!)

Crush each olive with the side of your knife, remove the pit, and then chop finely.


Keeping the heat on medium low, stir in 1 pound ground beef, ideally grass-fed chuck or 80/20 (I gotcha, Enrique!), but you could use extra lean or even turkey if you wanted to. Stir in the olives and raisins.


You just want to mix and cook until it starts to brown a little bit, then turn off the heat. Set up a small pan on another burner to cook a little bit through to safely test the seasoning.


Err on the side of over seasoning since it's going inside a pastry. Stir in more of whatever you think it needs.


When you're happy with the seasoning, turn the heat back on and cook the filling until all the red is gone but a little pink still remains. It will finish cooking in the oven when you put it in the pastry!

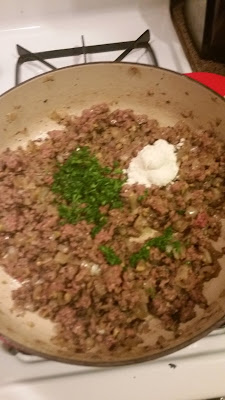
Finally, stir in the parsley and 1 or 2 tablespoons of flour. The flour is the latest bit of advice I've collected...thank you, Orlando! It helps thicken the juices so they don't ooze out of the pastry when you bake!

Let the filling cool at least to room temp, preferably a little chilled in the fridge, before you put it in the pastry. If it's too warm, it'll be too hard to seal the edges of the dough.

Roll out and fill the dough according to the directions in the pastry recipe. Bake at 400 degrees until browning as in the photo at the top.


Right click on the recipe card to save and print from your computer. 

Thursday, May 14, 2015

No Messin' Around Big Soft Chocolate Chip Cookies

In the crispy vs. chewy debate among chocolate chip cookie lovers, I definitely fall into the chewy camp. I usually pull them out of the oven a minute or two before you're "supposed to". 

Over the years I've tried many of those over-sized chocolate chip cookies at coffee shops and in box lunches, and they've never failed to disappoint. Some are too sweet, some don't taste like anything, some might as well be cake...but when I came across a recipe that had melted butter and an extra egg yolk, I decided to give it a whirl. HOLY COW it was good! This is slightly adapted from that recipe (in The Best Recipe by the amazing folks at Cook's Illustrated), mostly to make it bigger so there is enough for the whole office or a bake sale. Recipe card at bottom. 


Are you drooling yet? This recipe as written yields about 28 big cookies, depending on how much of the dough you eat. Not that you or I would eat raw dough. 


Melt 3 sticks of unsalted butter over low heat. 

Let cool for a little while until close to room temperature. 


Pre-heat the oven to 325.

Sift or whisk together the dry ingredients in a bowl:

2 1/4 c all-purpose flour
2 c white whole wheat flour
3/4 tsp salt (fine or kosher)
3/4 tsp baking soda

All one kind of flour or the other is totally fine. 

In a large bowl or the bowl of a stand mixer, put 2 c brown sugar (light or dark OK), 1 c white sugar, and the melted butter. 

Mix until well combined. Depending on your sugar it might seem a little grainy, but that's OK. 


Add 1 1/2 Tbsp (that's 4 1/2 tsp if that's easier) vanilla extract, 2 eggs and 2 egg yolks. As usual I've cracked the eggs into a glass container to make sure I haven't left any bits of shell in before I dump it into the sugar mix. The good eggs don't come cheap, so I don't want to have to start over!


Add the flour mixture and mix on low until just combined uniformly. It should look a little darker than your average cookie dough. If using a stand mixer, cover the mixer with a towel so you don't get flour all over the kitchen!


You shouldn't have little white bits like I do here. If you do, check to see if they're flour or baking soda. If they're flour it's probably fine. If they're baking soda, you'll need to make sure they get worked in or picked out. I'm gonna need to sift the flour for the next few recipes so I don't repeat this!


Stir in the 2 to 3 cups chocolate chips, ideally by hand or very quickly with the mixer. Use semisweet if you're baking for the kiddos, or bittersweet (if you can find them) for the grownups. My favorite chips are from Guittard. I always want to load it up with extra chocolate chips, but sometimes with this recipe they slide out of the dough!

This next step is a little odd, but since the good folks who wrote the original recipe did such good work, who am I to judge? You could probably just scoop out the dough to save a minute or two. 


Using a 1/4 cup measuring cup, scoop out some dough. Gently roll it into a ball with your hands.

Take the ball of dough and break it in half, then turn the rough sides up and stick it back together. 

Place the cookies about 2 1/2 inches apart on ungreased cookie sheets or parchment covered cookie sheets. 

Unless your cookie sheets are really big, you'll probably need three. Bake at 325 for a total of 14-18 minutes, switching the pans from one shelf to the other and front to back after 8 minutes. (The third pan will need to go in after the others come out). 

If you're going grown-up style, sprinkle a little coarse sea salt on top when you pull them out of the oven (just a few grains per cookie is good). Let cool on the pans for ten minutes, then remove with a spatula and place on a wire rack to finish cooling, unless, of course, you've already downed them all a la Cookie Monster. These are so big and filling you probably won't be able to!
To print recipe card, right click and save to your computer. 


Sunday, May 3, 2015

Black Bean Tostadas

You know how a certain smell will completely comfort you and take you back to a warm memory? One of those smells for me is corn tortillas frying in oil, preferably corn oil. As soon as I sense it, it's like I'm covered in a fuzzy blanket. This recipe will make 8-10 regular size tostadas or maybe 12-14 small ones. I'll add a recipe card soon, but the mouse on my laptop is buggy right now!


At some point in the 50s, my Pennsylvania and Illinois-born grandparents all packed up their kids and moved to Phoenix - apparently this was common medical advice for heart conditions and allergies and who knows what else. They all loved Arizona, though, and thus began a passion for Mexican food that runs deep in my family. My grandma's neighbors taught her to make several dishes that are now family traditions. This came in handy by the time I was born in Philadelphia, where there were no good Mexican restaurants at the time.

Last summer I shared some of these dishes with friends, leaving out tostada "shells", refried beans, guacamole and pico de gallo for my friends to assemble. I came back from frying tacos in the kitchen to find that most had instead treated the bowls of toppings as dips and the tostadas as some kind of giant chips to be broken up. Sweet as they are, they didn't even complain that I had mostly chips and dips for dinner. Next time, I'll remember to be more specific!

We didn't use black beans or the other toppings in this recipe when I was growing up, but they've become a favorite combination of mine.


Cook the beans (about 2 hours, can be done up to two days ahead):

For simplicity's sake you could use two cans of black beans, drained and rinsed well, and about 1/2 c broth in place of the 4 cups beans and liquid below. Jump to the cutting board pic! This morning I was able to hang out at home, cleaning and watching TV, so I was able to let the beans simmer away at a leisurely pace. 

Rinse and pick through 1 lb dried black beans, removing any weird stuff you find or beans that don't look like the others. I don't usually find things in bags of beans anymore, but I used to find dirt, rocks, and other random beans or grains hiding in there.


Put the beans in a large pot with 1/2 a large onion and 4 cloves peeled garlic. Cover with 2-3 inches of water. If any beans float up with the onions at this point, they're too dried out. Scoop them up and throw them out. Bring to a boil, reduce to a simmer and cover the pot.


Cook for about 2 hours, checking every 30 minutes or so to make sure there's enough water. Give a stir each time because beans can scorch on the bottom even if there's liquid on the top.

When the beans are about 15 minutes from done, stir 1/2 to 1 tsp salt into the pot. When finished, remove from the heat and set aside if using within a few hours, refrigerate if using the next day.

Measure 4 cups of the beans, including some of the cooking liquid. Chop the other 1/2 of the large onion and mince 4 more cloves of garlic. Put the rest of the beans in the fridge or freezer in their liquid.

You'll also need a teaspoon each of cumin and Mexican oregano (or regular oregano if that's what you've got). Or chili powder if you prefer. Make it how you like it.


Saute the onions over medium heat in 2 Tbsp vegetable oil until soft, about 5 minutes. Be careful not to brown them. No biggie if a few pieces start to brown, but start again if a quarter or more of them do.

Push the onions to the side and add the garlic to one side of the pan. Saute just until fragrant and then mix those in with the onions.


Do the same with the oregano and cumin that you did with the garlic. This will "wake up" the sleeping beauties that are dried spices and make them really flavorful. Just cook another minute.

Add the 4 c beans and liquid to the pot and heat through. Check to see it has enough salt, add a little fresh black pepper, then roughly puree them with a potato masher or a stick blender. Keep stirring and add more liquid or oil if it starts to dry out or stick to the bottom.  Turn off the heat for now.

If you're frying the tostadas, click here for directions and get the oil ready. You can also buy pre-made tostadas at many supermarkets or Mexican markets, next to the tortillas. They come in a stack in a bag like this.

When the tostadas are ready, prepare the other toppings.

Add caption
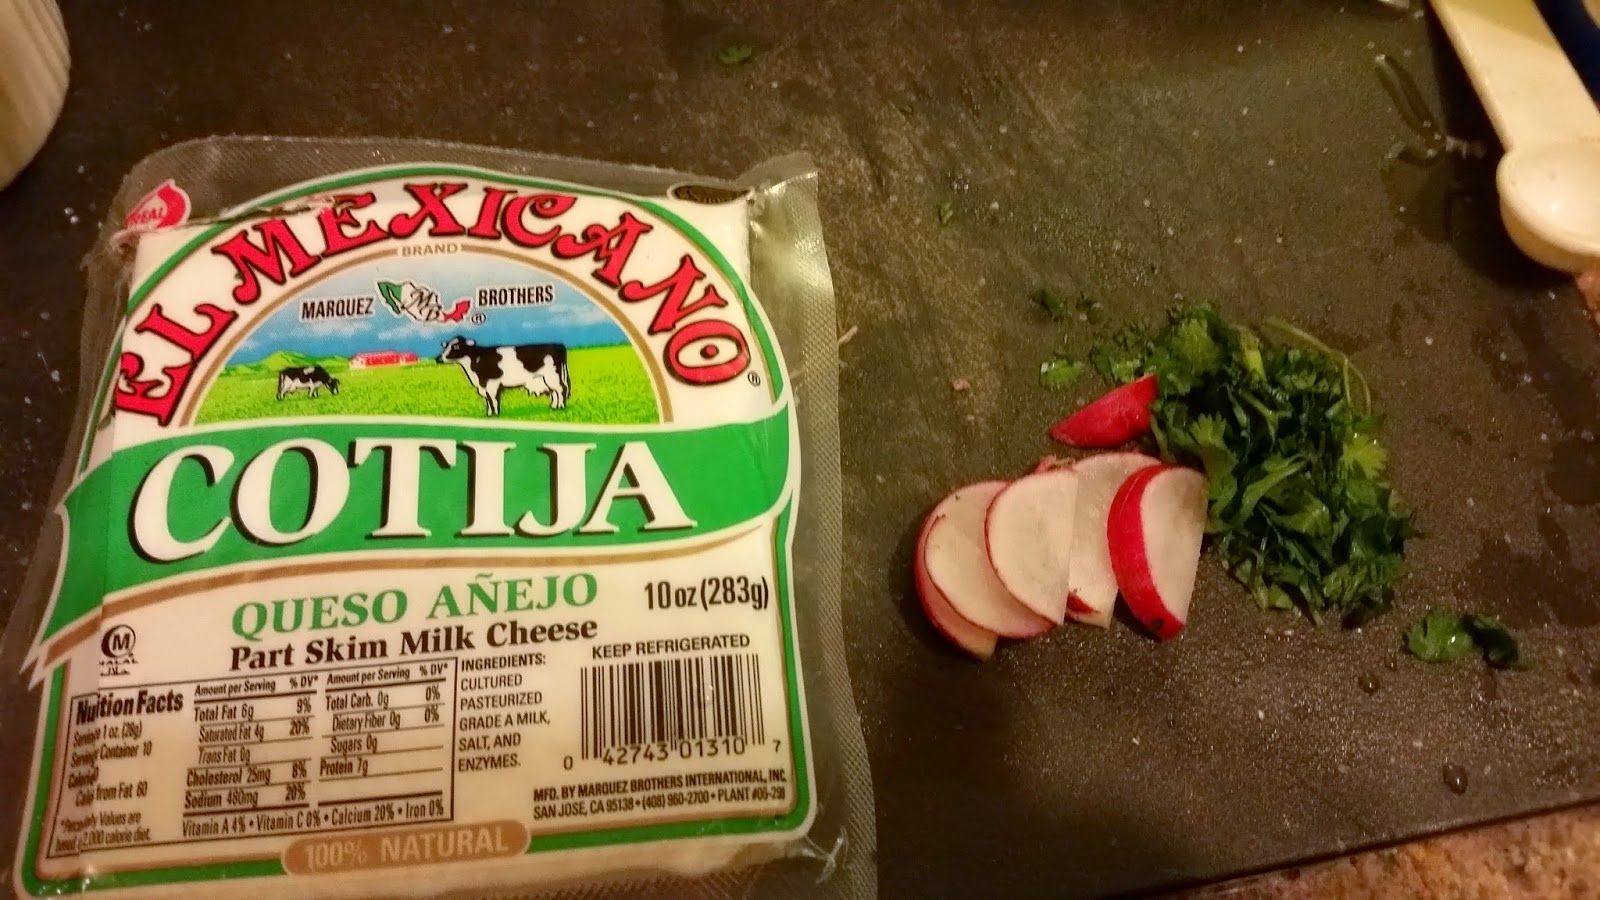
Crumble about 4-5 oz cotija cheese - this is a dry salty cheese kind of like feta, which you could use if you can't find cotija. 

Slice up 6-8 radishes and chop up 1/4-1/2 c cilantro leaves. Slice an avocado into 16-20 pieces.  I forgot to photograph the avocado. Oops!


If you'd rather use lettuce, tomatoes, and Monterey jack instead of these toppings, that's OK too. 

Gently re-heat the beans if they've cooled and spoon them onto the tostadas. Top each with about a tablespoon of cotija, 2 slices avocado, 6 or so slices of radish and as much cilantro as tickles your fancy. Shake your favorite hot sauce on top - a chipotle one would be really good here!