Saturday, October 31, 2015

Lentil and Spinach Soup, Instant Pot or Not

It's soup season...well, at my place it's always soup season. I love soup even on hot days. It's so comforting to body and soul, and if made well, nutritious and filling. It's a pretty easy formula, too...saute meat if using, remove and add veg, add wine or vinegar, put everything back in with broth, and cook until ready, usually about an hour on the stove. This time I gave it a whirl in the Gizmo and it came out great in much less time. 


About broth or stock: they're more or less the same thing, as the definitions seem to be changing over the years. I made the broth I used for this from kitchen scraps: stems from mustard greens and Swiss chard, a couple of leftover carrots, a stalk of celery, and half an onion left from some other recipe. If you don't want to make it, though, you can buy some pretty good canned or tetra-pack ones to keep in the cabinet. I like the organic chicken stock from Costco or the low-sodium (not reduced-sodium, which is still really salty) from TJs or Whole Foods. 

Lentils and greens are one of my favorite earthy combinations, so I've put them together in a soup that can be made with or without a little bacon for added flavor. A humble but hearty soup with a little crusty bread on the side is just the thing for a delicious but inexpensive dinner. I don't usually measure anything for soup, but I did this time so I could share, and so I could make sure I didn't turn it into a stew by adding too much stuff!


All measurements can be adjusted, but start with:
-5 cups broth or water, or a mix of the two

-1/4 lb slab bacon (optional)
-2 tsp olive oil
-1 Tbsp red or white wine vinegar OR 1/4 c white wine
-1 onion
-2 carrots
-1 or 2 stalks of celery
-2 large cloves of garlic, or 3 small
-1 Tbsp tomato paste
-1 tsp cumin
-1/2 tsp turmeric
-1 c brown or green lentils, rinsed
-black pepper and salt to taste
-2-4 cups washed baby spinach leaves


If you want to use bacon but can't find slab bacon, just use some thick slices and cut them into 1/4 in wide strips. 

If you have a slab, trim off the "rind" and save that for the next batch of broth you make. Cut the rest into 1/4 in (you know, 1/4 inch-ish) cubes. 


Instant Pot: press the saute button and immediately add bacon and 1 tsp olive oil to pot. Saute until golden brown, stirring every couple of minutes.

Stovetop: put bacon and 1 tsp oil in a cold pan over medium heat. Saute until golden brown, stirring every couple of minutes. Remove bacon to a small bowl and set aside.
While the bacon cooks, finely dice the onions, carrots and celery. If you're a bell pepper kind of person, dice up one of those, too.

Saute those in the pan or pot you just cooked the bacon in. Add the vinegar or wine and scrape up the yummy brown stuff at the bottom of the pan, adding that flavor to the mix. 

Add garlic, spices and tomato paste and saute about 5 minutes until everything is soft. Add a little black pepper and, if not using bacon, a little salt (1/2 to 1 teaspoon). 

Add broth and water. Keep on saute in IP until liquid is warm or on medium in stock pot until liquid is at a simmer. Add lentils. 

IP: Cancel saute and lock lid into place. Press manual and set for 8 minutes. Let machine do natural release for about 5 minutes, then do quick release. No need to unplug until after QR. 

Stovetop: Put lid on pot, turn heat down to low and let simmer for an hour. Check periodically to make sure it's still at a simmer and bottom ingredients aren't sticking. 

Add 2-4 cups baby spinach (or chopped big spinach with stems removed). Stir until wilted. 

Stir in bacon if using. 

Check for salt and pepper, adding more if needed. You may not need any more, depending on the ingredients you used (bacon and broth). 


Serve up with whatever you need for an AH meal, or if not AH, crusty bread or your favorite crackers! 


Tuesday, October 27, 2015

Black Bean and Cheese Tamales

Last week's batch of pork tamales was super yummy and left me with lots of extra corn masa flour, so I decided to do it again, but with black beans and cheese this time. It turned out even yummier, IMO, and I'm getting more comfortable with folding them. This recipe makes just a dozen, but could easily be doubled.


a
A couple of hours ahead, start soaking 15-20 corn husks in hot water. Weigh them down with a bowl so they don't float up.

Take one cup of cooked black beans (or pintos, if you prefer) and season them with sauteed onion and Mexican spices (I used cumin and Mexican oregano, but you could certainly add chilies or chili powder). Let cool to room temp while you prepare the masa and cheese. 

Dice or shred 4 oz Monterey Jack, Colby Jack or Mild Cheddar. I prefer dicing because it's easier to wash a knife than a grater!

My Home Ec teacher from middle school would be SO PROUD that I remembered this next step!

Measure out 2/3 c shortening or lard of choice by the displacement method: Scoop into a 2 c or larger liquid measure that has 1 c water in it. 

When the water reaches the 1 2/3 c line, you've got 2/3 cup. You can use this method for other fats and even for peanut butter if it's not the runny kind. 

Pour off the water and melt the fat in a pan or in the microwave over medium-low heat. 
Mix up the dry ingredients in a large bowl: 2 c instant masa, 1 tsp baking powder, and 1/2 tsp salt. 
Stir in 2 1/2 cups low-sodium or homemade veggie or chicken broth. You can start with a spoon, but it's good to just get your hands in there. 

If you don't have any broth, you can use water. You'll need to add a little extra salt and maybe some spices, though, so it's not bland. 


Pour in the melted shortening and mix in well with your hands. Knead for a minute or two.

Choose the widest corn husks. If you have two narrow ones, overlap them to make one tamal.

Spoon about 1/4 cup of the masa (Spanish for dough) into the husk, spreading it 1/4 in thin. Top it with a spoonful of the bean mixture and a few pieces of cheese.

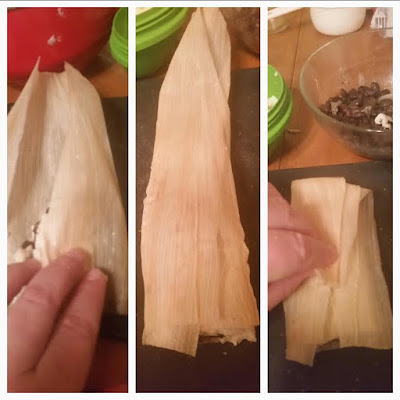
Fold one side up, covering much of the filling with the masa. (See below).

Repeat with the other side, forming the tamal. You can unfold it to peek, but then fold both sides over the top.

If the filling is peeking out a little, that's fine. If it's peeking out a lot, I might put a little "patch" of masa over it. 
Fold over one side, then the other, then fold the "tail" over. 

Optional: cut strips of extra husks to make ties to wrap around the tamales. If you're making two fillings, this can be helpful in distinguishing between the two when they're served. Besides, it's kinda cute. (See top picture).

Steam the tamales, open end up, in a large stock pot on a steamer rack or on a trivet in an electric pressure cooker.

60 min in the stock pot, checking periodically to make sure the water hasn't cooked off, or 40 minutes on steam in the electric pressure cooker with natural pressure release. 

This pic must be blurry because I was so excited to get them cooked!

Serve with your favorite cooked salsa, perhaps roasted tomato or tomatillo. 

Thursday, October 22, 2015

Dulce de Leche Cheesecake with Alfajor Crust (electric pressure cooker recipe)

Recently I joined a Facebook group of people who have the same Instant Pot multicooker I bought a little while ago, and since then I've been seeing pictures of cheesecake many times a day! I hadn't made one in a really long time, partly because of the calories and partly because the process is a long one, but I thought I'd give it a go now that I'm learning how to use the pressure cooker! It cooks in less than an hour total. You have to get a 7" pan to fit it inside the cooker, but that's much better than using my other 10" pan, calorie-wise! It's best to use a springform pan or another pan with a removable bottom, 3 inches or more deep. 


I had the idea of making a dulce de leche cheesecake, but it seemed wrong somehow to use a graham cracker crust. You could definitely do that, though - it'd be delicious, too. I decided instead to use the cornstarch shortbread cookies that are used for Alfajores de Maizena, a traditional sandwich cookie with dulce de leche in the middle and coconut on the sides. Working from David Lebovitz's dulce de leche cheesecake recipe and cheesecake instructions from pressurecookingtoday.com, I came up with something I think is pretty good! What I brought to the teachers' room has disappeared, at least ;)


Before you start, bring cream cheese, eggs and dulce de leche to room temp. It's really important in this case so you don't have a lumpy or overbeaten batter. 


As I said, you could use graham crackers, or you could use some store-bought shortbread cookies. These are the alfajor cookies from the link above.


Put 8 oz of the cookies into a food processor and pulse until they turn into a coarse sand (if you don't want to wash out a food processor, put them in a ziploc bag and smash them into bits.)

Add 2 Tbsp melted butter and a small pinch of salt. Mix until uniform in the food processor or in a bowl. 

Press the crumb mixture into the bottom and halfway up the sides (y'know, halfway-ish). Set the pan in the fridge until the cheese part is ready.  

I think next time I'll add a thin layer of dulce de leche on top of this for extra flavor!
Cream in a mixer on medium speed two 8 oz packages of cream cheese with 1/3 cup granulated or raw sugar. Beat in 2 tsp vanilla extract

One at a time, beat in two eggs, scraping down the sides after each addition. 

Then, beat in 1/2 cup dulce de leche! In Mexican markets you might find it under the name cajeta, but they definitely wouldn't call it that in Argentina. This one looks kinda lumpy 'cause I made it at home, also in the pressure cooker, but it'll mix in evenly. 


Resist the temptation to eat all the batter with a spoon, because raw egg yolks. blah blah blah. Pour the batter over the crust in the pan, smoothing out the top. Make a sling out of tin foil to pull it out of the gizmo more easily. 

To make the sling, tear off an 18" piece of foil and fold in in thirds. This one is a little too short, but I was able to use the trivet handles to pull it out. 

Cover the pan with foil. Put two cups of water in the bottom of the pot (not in the cake!), then put in a trivet to stand the cake on, and finally, the pan. 

Lock up the pan and set it to cook at high pressure for 27 minutes. Let the pressure release naturally for ten minutes before releasing the rest of the pressure. 


 Carefully remove it from the pot and take off the foil. Let cool to room temperature, and then make the glaze. 

Melt together 1/3 cup dulce de leche and 1 Tbsp milk or cream, whisking just until combined. Pour on top of the cheesecake. 
Sprinkle some sweetened shredded coconut (unsweetened is fine, as I found out when my market only had that in stock) in a ring around the edge of the top. 

Refrigerate the cheesecake at least one more hour or overnight. Enjoy with coffee and good friends!


Wednesday, October 21, 2015

Alfajores de Maizena

I once described alfajores to a friend as Argentinian moon pies. They're large (sometimes medium) sandwich cookies of shortbread filled with dulce de leche, sometimes enrobed in chocolate or meringue. 

If you go to Buenos Aires, all the tourist shops will be selling Alfajores Havanna, which are absolutely delicious. My favorite kind, though, is this variety, which is often homemade. The shortbread is heavy on cornstarch (Maizena in Spanish), making it crumbly and rich in flavor. There's another company now that makes this kind now, but I forget their name...apparently it was started by a member of the family that makes the Havannas. 

Once upon a time I asked someone there for a recipe, and instead of the directions I was sent home with a giant styrofoam container of the cookies and two big tubs of dulce de leche so I could assemble them once I got home to California. YUM! But that didn't help me make them at home. 

Enter my favorite used bookstores, Pegasus and Pendragon, which have immaculate used cookbooks for half price. Wandering through there one day, I found Nick Malgeri's A Baker's Tour, which quickly became one of my favorite baking books. It has recipes from all over the world, and not one of the ones I've tried has let me down. This is a slight adaptation of his beautiful recipe. 

So, like most cookie and cake recipes, it starts with mixing the dry ingredients together and then creaming the butter and sugar. Preheat the oven to 350 and line two baking sheets with parchment or silicone mats.

In a medium bowl, mix 1 1/3 c all purpose flour, 1 1/2 c cornstarch, and 1 tsp baking powder. Set aside. 

I haven't tried whole wheat flour in this recipe...if I did, I might try whole grain pastry flour. 
Cream 10 Tbsp unsalted butter (1 stick plus 2 Tbsp) and 2/3 c sugar with a mixer on medium speed. Beat until it lightens in color and texture. Scrape down the sides and scrape up the bottom. Add 1 tsp grated lemon zest, 2 tsp vanilla and 1 tsp water. Beat for about 30 seconds and scrape down again before beating in, one at a time, 4 egg yolks. 

I happened to have these four left over after the Espresso Buttercream last weekend. They say you can freeze them, but I haven't had great luck with that, at least not with using them to make custard. Wah. 

Scrape down again and then add the dry ingredients. Only mix for a little bit until they mix together. Remember to start the mixer on LOW when you start mixing them in...you could have a whole kitchen full of flour and cornstarch otherwise! Holding a dish towel loosely around the bowl also helps cut down on cleanup. Trust me, I've been there!
The dough will be pretty crumbly, and may still look like a big bowl of crumbs in the bowl. 

Turn it out onto a floured board and push it together as best you can, turning it over on itself a couple of times. 
Roll out 1/3 of the dough at a time with a rolling pin. Cut out circles 2-3 inches in diameter. If you don't have biscuit cutters, you can use a straight edged glass or a clean can. Whatever works!

Gather the scraps (the ones that don't make it into your mouth) and roll them out to cut more cookies. 


Bake in a 350 degree oven for about 15 minutes (12 to 17 depending on your oven and the size of the cookies) until edges are just starting to turn golden brown. Remove to a rack to let cool completely before filling. 

I'm pretty bad at rolling things out evenly. If I see that one is a lot thicker than the others, I'll roll it a little more and use the cutter again to trim off the extra. It's not the end of the world, though. Rustic is in, no? 

Fill the cookies: spoon some dulce de leche between two cookies and stick them together. Try to find pairs that match well - despite using the same cutter for all of them, somehow they deform slightly in the baking process. Roll the edges of the cookies in sweetened shredded coconut and enjoy! 

About the dulce de leche: you can find it at Latin markets and upscale supermarkets these days, or you can follow this oven recipe or this pressure cooker recipe to make it from a can or two of sweetened condensed milk. 


Saturday, October 17, 2015

Rich Chocolate Cake with Espresso Buttercream

A colleague has a birthday this week that ends in a zero! Such a birthday deserves a special cake, and yet, when baking on a Friday night, I have to keep it simple. Turns out she loves the pairing of chocolate and coffee, also one of my favorite classic combinations and a good way to make a simple cake seem fancy. Hooray! 


I decided to combine a slight adaptation of Amy Sedaris's Rich Chocolate Cake, my go-to chocolate cake and cupcake recipe, with a coffee buttercream recipe I found from Martha Stewart's website. If you haven't read Amy's first book, I like you, you should go find a copy STAT. It's hilarious (the Rich Chocolate Cake is in a chapter about entertaining a rich uncle that also includes Silver Dollar Pancakes) and the recipes are actually really good! The cocoa whipped cream topping that accompanies the cake in the book is also delicious, but not the best for a traveling cake. This one has to make it 15+ miles tomorrow! 


OK, so the cake: Preheat the oven to 350. 


Prepare two 9" x 2" round pans (or one 13" x 9" pan) by rubbing some soft butter over the bottom and sides. Put a Tbsp of flour in each pan and tap the flour around in circles until the pan is covered with the flour. 

I usually line the bottom of the pan with waxed paper or parchment, too, but as it turns out, I'm out of both. Oops!


Mix 3/4 cup unsweetened cocoa powder, 3/4 cup boiling water, and 1 c buttermilk in a bowl. Stir well and set aside. 


This step is what makes this recipe so good. Bland chocolate cake makes me sad. Some good recipes add the cocoa to hot water to "bloom" the flavor, and others add buttermilk for the same reason. This one has both, and it makes all the difference! It makes the cake super chocolatey without making it fudgy. Fudgy is good sometimes, but I like it like this, too. 


I bought these Pyrex liquid measures in college and was chided by a friend for buying something expensive "like your mom has". Twenty-some years later, I'm glad I splurged on them!

Another secret weapon in chocolate cake baking: instant espresso powder. Add 1 tsp to the cocoa mixture. 

In another medium bowl, mix 2 1/2 c flour (white or a mix of white and whole wheat), 1 1/2 tsp baking powder, 1/2 tsp baking soda, and 1 tsp salt. 


You need salt in sweet stuff to bring balance and highlight the flavors. It's why we're all in love with salted caramel right now!


Cream (on medium speed) 1 1/2 sticks unsalted butter and 1 3/4 c granulated or raw sugar until fluffy. 

It's best if the butter is softened to close to room temp, but if you forget it's ok, just beat it longer. Do take the butter out for the buttercream now, if you've forgotten. It's more important that that butter be soft. 


Add 4 eggs, one at a time, stopping to scrape down the bowl between additions. Beat for another minute after the last one, then add 2 tsp vanilla extract.

Scrape down the sides and scrape up the bottom of the bowl, then add 1/3 of the flour mix, beating just to incorporate, and 1/3 of the cocoa mix, again beating just to incorporate. Scrape down the sides and repeat with the remaining thirds of the bowls. 


Pour the batter into the prepared pans and put them in the oven. Put them on the same shelf if possible, making sure they're not touching each other or the sides of the oven. 

Bake for about 25 min, until a toothpick comes out clean and the cake comes away from the sides. 


Start checking after 20 minutes, though, and if they're not the same amount of "done", switch the positions of the pans. 


Remove the pans from the oven when they pass the toothpick test and let cool in the pans for 10 minutes.
Place a plate on top of the pan and flip the cake onto it, then place a cooling rack on top of the cake and invert it so the top is up. Let cool completely before making the frosting or buttercream.

You could absolutely do an American Buttercream for this, aka the good old powdered sugar frosting recipe on the back of the box. 
To start a different kind of buttercream, make sure your 3 sticks of butter are nice and soft.  Cut it into small pieces. 

Dissolve 1 Tbsp plus 1 tsp espresso powder in 2 Tbsp hot water. Set aside.

Add 4 egg whites and 1 1/4 sugar to a large heatproof bowl, ideally the bowl of a stand mixer. Set the bowl over simmering water and whisk until the sugar is dissolved and mixture is hot to the touch. 
With the whisk attachment of a stand mixer, or a plain old cheapy hand mixer, whatever you've got, start beating the egg white mixture on low and gradually change to high speed. 

Beat until the egg whites are glossy and stand in stiff peaks when you left the beaters, about 8-10 minutes. 

Beat in the butter pieces until smooth, then pour in the coffee mixture and beat until combined with no streaks. Turn off and scrape down the sides, then start again if it comes up like this. 
p
Put the first layer on the plate you'll use for serving. Trim the top a little to help the layers stack nicely: place a long serrated knife at the edge of the dome-y part and hold it there while you turn the plate in a circle. Remove that little piece and eat it - you gotta do some quality control, am I right?


Use a long spatula or a butter knife to put a big glob of buttercream on the middle of the cake. Spread to the edges from the middle, adding more if you need to. 

Repeat with the second layer.


Refrigerate the cake until it's almost time to serve.

If you're taking the cake somewhere, chill before you go and use a bamboo skewer or two to make sure the layers stay put!