This is the recipe that planted the seed for the blog!
When I was little, I remember helping my grandmother with sorghum cookies around the holidays. When it came time for her to make the stollen, however, we all cleared out of the kitchen and tried not to giggle as she struggled and swore in perfect Grandma style: "Oh, pshaw! Oh, drat!" and my favorite, "Ohhhh, crrrrushed strawberries!" I didn't like the stollen, but didn't dare say so after she had gone to so much trouble.

Over the past few years, thinking of Grandma Irene, I've bought a few loaves of stollen from Trader Joe's and Whole Foods, and much to my surprise, I really liked them! Last year around this time, I dug into the family recipe compendium in search of Grandma's stollen recipe. I looked at her recipe and at the version my aunt made with dry milk from her food storage and extra candied cherries for the beautiful holiday colors, and it dawned on me: it's the candied cherries I don't like. Fruitcake? Same thing. The rummy cake is delicious, but the candied, weird green fruit? Not so much.
I even polled the cousins on FaceBook about their preference for dried vs candied fruit, and the responses confirmed my suspicion. "Stollen? I love lemon bread!" and "yeah, just dried for us." I went back to the drawing board and found a recipe at
brooklynfarmhouse.com to tweak to heavenly results. It's an
involved process that takes a few hours, but none of the steps are terrible difficult.

An hour or two before you really get started, take
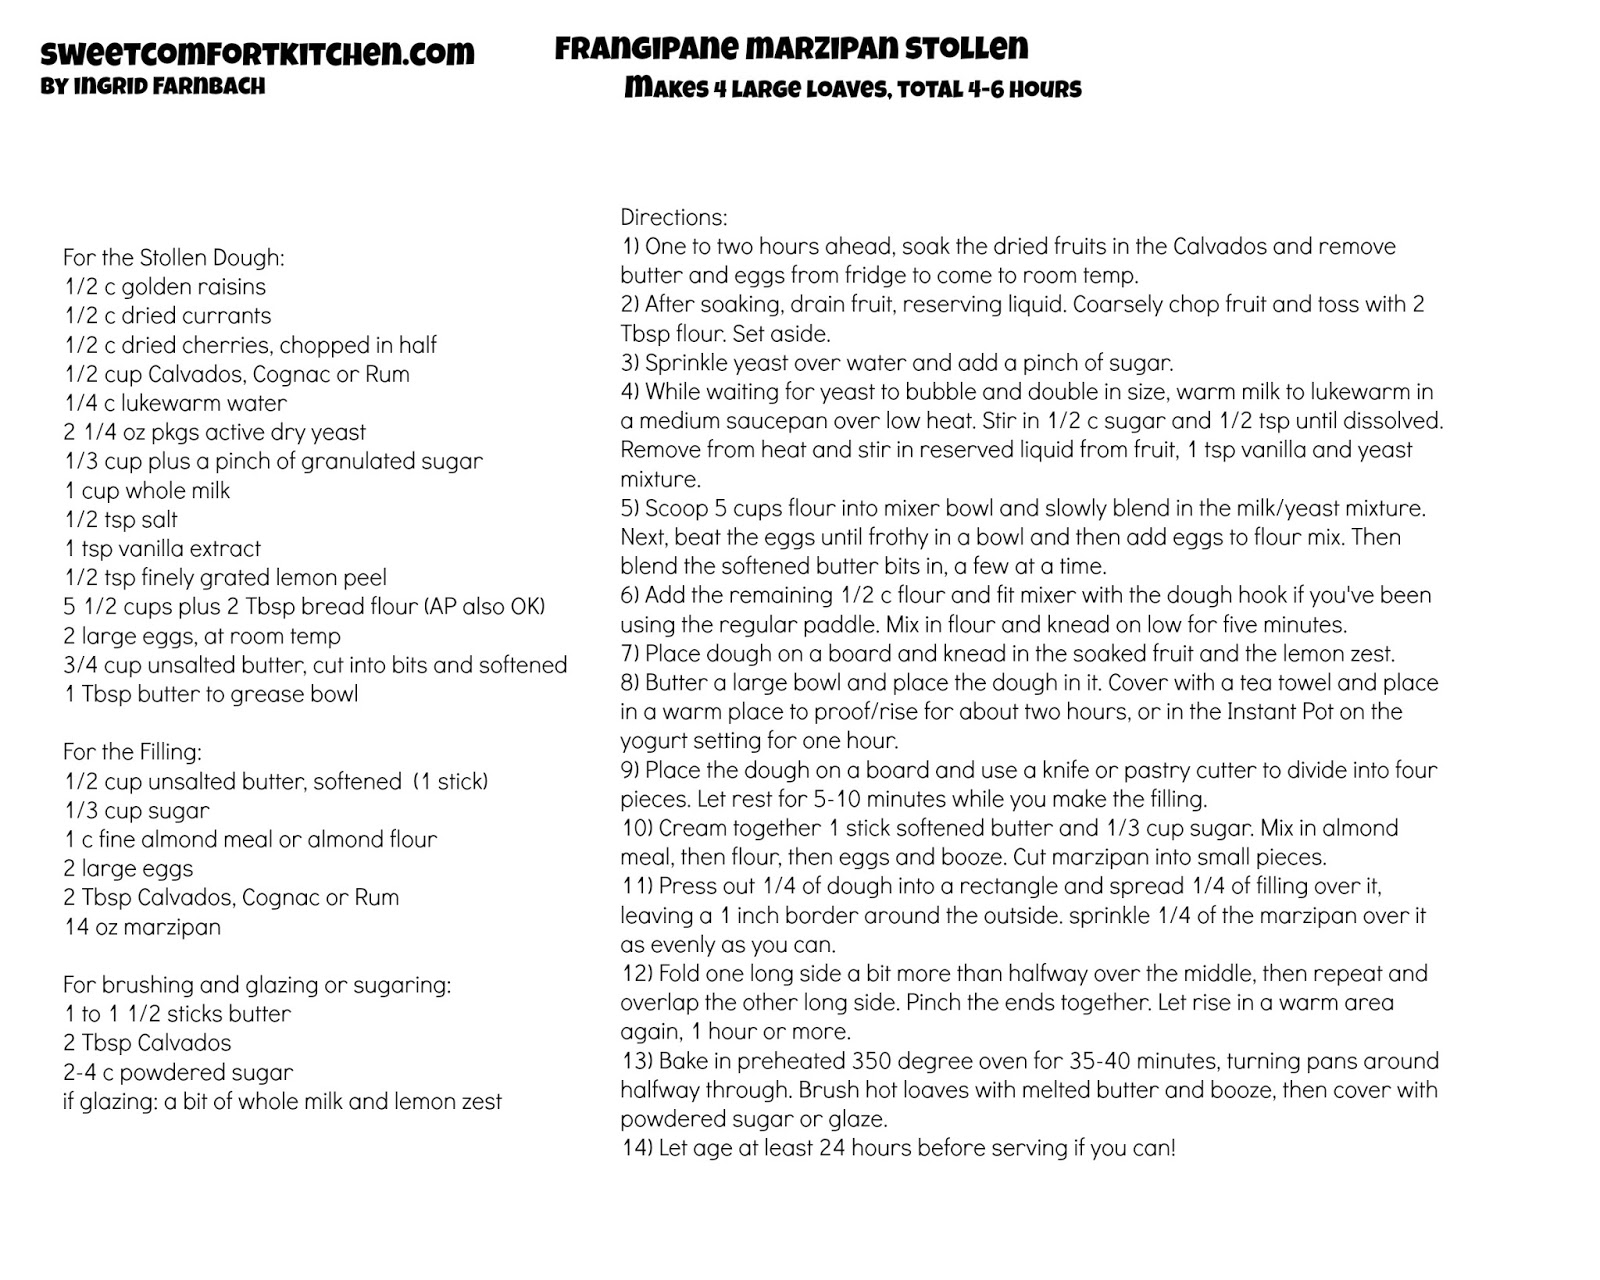
1 1/2 sticks unsalted butter out of the fridge to soften. Soak
1/2 cup each dried cherries, golden raisins, and currants in
1/2 c Calvados apple brandy. In her later years, Grandma gave up alcohol, but her younger self would have approved. If you can't find or don't want to splurge on Calvados (I get a deal on it at Trader Joe's every fall), you could use rum, cognac or even warm water. Whatever you do, DO NOT use that green apple liqueur stuff they put in apple-tinis.
After an hour or more of soaking the fruit, put the contents
two 1/4 ounce packages of active dry yeast (not instant) and
a pinch of sugar into
1/4 c lukewarm water. Stir gently and set aside until the mixture gets nice and bubbly like the second photo. This could take two to ten minutes - the volume should be double but in this case it quadrupled!
While the yeast does its thing, drain the fruit, reserving the liquid for the dough.
Coarsely chop the fruit for better distribution in the dough and toss it in a bowl with
2 Tbsp flour.
In a heavy bottomed small to medium saucepan, heat
1 c milk, 1/3 c granulated or raw sugar, and
1/2 tsp salt, stirring constantly to dissolve the sugar, to lukewarm (110 degrees-ish). Don't overheat the milk or you'll kill the yeast when you stir it together.
Turn off the heat and stir in
reserved liquid from fruit, 1 tsp vanilla extract, and
1 tsp grated lemon zest. Let cool for a minute and gently stir in the
yeast mixture.
Now I'm pretty sure that these next few steps are where the cussin' and fussin' happened, so I strongly recommend using a stand mixer if you have one. Otherwise, stir by hand and cuss away!
Measure
5 cups all-purpose flour into a large bowl (the stand mixer bowl if you have it), and use a fork to mix the milk-yeast mixture into it, a cup or so at a time.
You'll use the mixer later, but it's best to make sure you don't over-mix.
Crack two eggs into a small bowl, fish out any little bits of shell (I had one stubborn one that took a minute), and beat until frothy.
Gently beat the eggs into the flour mixture on low.
Cut the softened
butter into small pieces and. using the dough hook or a wooden spoon and strong arms, work it into the dough a few tablespoons at a time. The resulting dough will be wet and buttery. Yummmm.
Again, if you're doing this by hand, cuss away!
Add
1/2 c more flour to the bowl or to a work board, then knead 5 minutes with the machine or ten minutes by hand. You want the dough to feel smooth and elastic by the end, and all the flour to be incorporated.
Work in the fruit now before letting the dough rise: Press the dough into a rectangle and scatter half the fruit across it. Fold half the dough over the other half, press it out a little more and scatter the other half of the fruit on top.
Pull it all back together and then knead gently to distribute the fruit through the dough for just a minute or so, stopping before the fruit starts to color the dough.
Butter a large bowl and set the dough inside it. Cover the bowl with a clean tea towel and set the dough in a warm area to rise for about two hours or until doubled in size.
If you have an Instant Pot or similar Gizmo with a yogurt setting, you can put the dough in and set it to yogurt for one hour. It should rise in that time, saving you an hour!
If something goes wrong and it doesn't rise, you don't have to throw it all out. You can keep going--you'll just have a dense but yummy product. Happened to me last time, and my lovely co-workers ate the loaf I took them in no time flat!
In the meantime,
take 1 more stick of butter out of the fridge to soften.
When the dough has risen (or proofed, or
proved as they say on the Great British Baking show), remove it from the bowl and set it on a lightly floured board. Cut it in four even pieces and let it rest for 5-10 minutes.
While it rests, make the
frangipane (almond) filling:
Cream
1 stick softened unsalted butter with
1/3 c sugar in a mixer. Add
1 c fine almond meal or almond flour and mix in, then mix in
2 Tbsp all-purpose flour, 2 eggs, and
2 Tbsp more of your booze of choice (Calvados, Rum or Cognac). Set aside for a moment, but don't put it in the fridge.
Cut
14 oz marzipan (two of these packages) into small pieces.
Assemble the Stollen:
Press one fourth of the dough into a rectangle on the floured board. Spread one fourth of the Frangipane filling over the rectangle, leaving a one inch border all around the outside.
Scatter one fourth of the marzipan pieces over the frangipane.
Fold one long side in, more than halfway over the middle, then fold up the other long side so that it overlaps like a business letter. Pinch the ends closed. Repeat with the other three parts of dough, frangipane and marzipan.
It's supposed to look kind of like swaddling :-)
Get out two large baking sheets and place two stollen on each. Melt about three or four tablespoons of butter (30 seconds in the microwave should do it) and brush over the loaves. Leave them in a warm area again, and let them rise for about an hour. When the hour is almost up, preheat the oven to 350.
They won't likely double in size, but you'll see a difference. Alas, there is no Instant Pot shortcut at this point. Le sigh.
Bake the loaves for a total of 35-40 minutes, moving the top pan to the bottom and the bottom to the top halfway through that time (also turn them front to back) for even browning.
Remove them from the oven when they're beautifully browned like this. Melt
five more Tbsp butter and add
2 more Tbsp booze to it. Brush over the hot loaves.
The traditional way to cover the loaves is to cover them in a thick layer of powdered sugar right away while the brushed-on butter is still warm and damp. (Cool them on baking racks before serving).
Stollen are traditionally aged in a cool area for several days and as long as a week. In Germany they're kept for weeks, but a) I've never had any last that long, and 2) winters in CA are not quite as cold as winters in Germany. I'm not sure how long they would really keep here. I'm confident that they're OK for about a week, wrapped well, though, because of the sugar coating. It prevents mold and other yucky things from setting in.
I prefer a powdered sugar glaze to the plain powdered sugar (less messy to eat, ergo less evidence to hide on your fingers and clothes if you're sneaking a piece here and there). My method is very scientific: dump some powdered sugar and milk in a bowl, grate in some lemon or orange zest, stir in a little vanilla, and pour it over the slightly cooled loaves. Finish cooling and share with neighbors, friends and family. Because they keep for a little while, you can even mail a couple out via a two-day service if you like.


